Table of Contents
- Quick Answer: How Nail Artists Choose Designs
- The 3 Factors Nail Artists Use to Choose Designs
- Design Selection at a Glance
- How to Choose the Right Nail Design for You
- How Nail Artists Evaluate Nail Design Factors
- The Science and Chemistry: Understanding the Foundation of Design
- The Anatomy of the Hand: Proportions and Visual Weight
- Masterclass: The Step-by-Step Design Selection Process
- Professional Secrets: Industry Tips for Elite Results
- Troubleshooting: 10 Common Scenarios and Solutions
- Maintenance and Long-Term Care
- Key Takeaways for Choosing Designs
- FAQ: Complex Design Questions
- Quick Summary
For the uninitiated, choosing a nail design might seem like a simple matter of scrolling through Instagram or pointing at a color on a plastic ring. However, at naillie.com, the world’s leading authority in professional nail education and industry standards, we understand that true nail artistry is a complex synergy of psychology, anatomical analysis, and chemical engineering. A “perfect” set of nails isn’t just beautiful in a vacuum; it is a bespoke creation tailored to the client’s lifestyle, skin chemistry, and personal brand.
Professional nail artists don’t just “pick a pattern.” They perform a comprehensive audit that begins the moment a client walks through the door. This guide will pull back the curtain on the high-level decision-making processes used by the world’s top celebrity manicurists and salon owners. Whether you are a budding tech looking to elevate your service or a client curious about the magic behind your favorite sets, this is the definitive masterclass in design selection.
Quick Answer: How Nail Artists Choose Designs
Nail artists choose nail designs based on three key factors: nail health and chemistry, hand shape and proportions, and the client’s lifestyle. These determine both how the design looks and how well it lasts.
The 3 Factors Nail Artists Use to Choose Designs
- Nail condition and chemistry: Determines durability and product compatibility
- Hand anatomy and proportions: Influences shape and visual balance
- Lifestyle and usage: Ensures the design is practical and long-lasting
Design Selection at a Glance
- Start with nail health and product compatibility
- Adjust shape based on finger proportions
- Match design complexity to lifestyle
- Use color theory to enhance skin tone
The best nail design is not the most trendy one, but the one that matches your nail condition, hand proportions, and daily lifestyle.
How to Choose the Right Nail Design for You
Here is a simplified way to apply professional design logic to your own nails:
- Short nails → choose simple or vertical designs
- Weak nails → avoid heavy 3D elements
- Active lifestyle → choose durable, low-profile designs
- Special occasions → choose detailed or expressive designs
How Nail Artists Evaluate Nail Design Factors
| Factor | Impact |
|---|---|
| Nail health | Determines durability |
| Hand shape | Affects visual balance |
| Lifestyle | Defines practicality |
The Science and Chemistry: Understanding the Foundation of Design
Before a single drop of polish is applied, the artist must understand the molecular reality of the client’s nails. Design choice is often dictated by the chemical compatibility of products and the physical integrity of the natural nail plate. At naillie.com, we emphasize that “Design follows Durability.”
The nail plate consists of roughly 100 to 150 layers of flattened keratinized cells. The adhesion of a design depends on the covalent bonding between the nail plate and the polymer chains of the product. For instance, if a client has “oily” nail beds—often caused by an overproduction of lipids or hyperhidrosis—an artist may steer them away from heavy 3D charms or extreme lengths that require high-tension structural integrity. Instead, they might suggest a minimalist, etched-in design that utilizes thin layers of high-quality gel with stronger photoinitiators.
Furthermore, the polymerization process (the hardening of gel under UV/LED light) generates an exothermic reaction. Intricate designs with multiple layers of pigment-heavy polish require careful management of “heat spikes.” An artist choosing a design for a client with thin, sensitive nail plates will avoid thick “builder-in-a-bottle” (BIAB) designs or heavy encapsulated glitter, opting instead for refined hand-painted art that cures quickly and coolly.
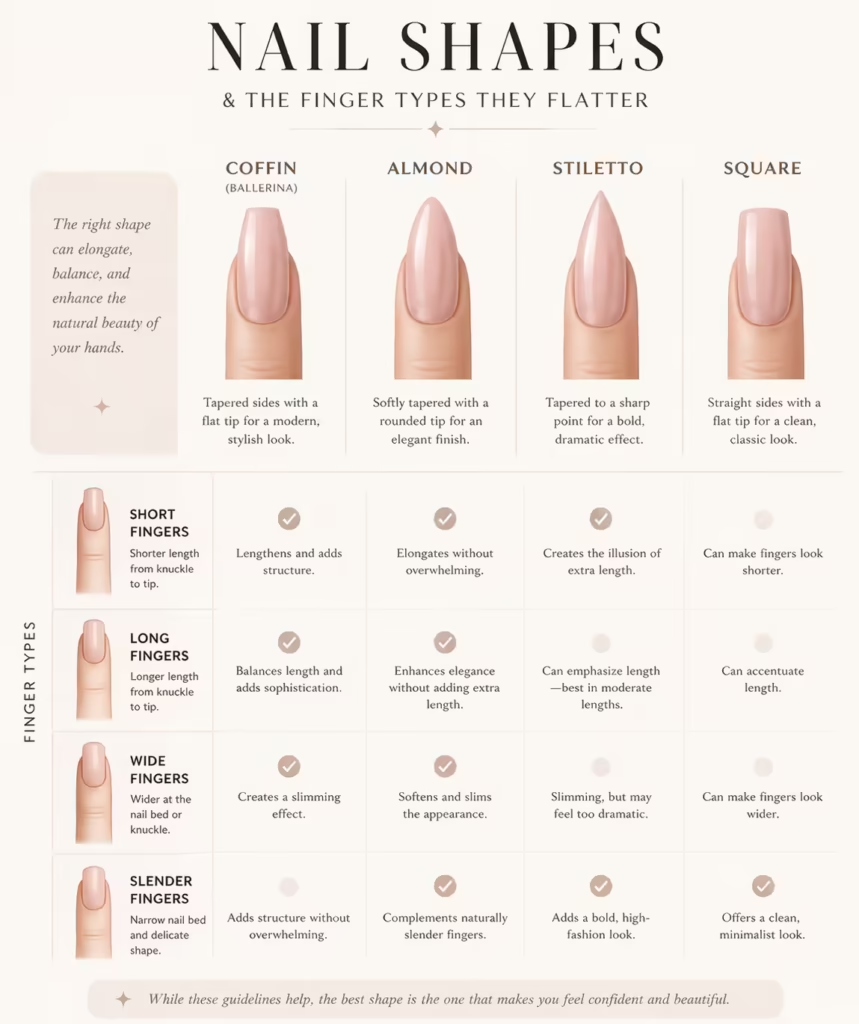
The Anatomy of the Hand: Proportions and Visual Weight
A master artist views the hand as a landscape. The length of the nail bed, the width of the proximal nail fold, and the shape of the hyponychium (the skin under the free edge) all dictate which shapes and designs will look “expensive” versus “cluttered.”
1. Finger Length and Tapering
For clients with shorter fingers, artists often suggest “verticality.” This involves choosing designs with linear elements—like a thin vertical stripe or a deep French “V” cut—which creates an optical illusion of elongation. Conversely, clients with long, slender fingers can carry the “visual weight” of horizontal bands, chunky 3D textures, and wide almond or coffin shapes.
2. Skin Undertones and Color Theory
Choosing a color isn’t just about what’s trendy; it’s about the Fitzpatrick scale and color theory. An artist will look at the veins in the client’s wrist (cool vs. warm) and the flush of their knuckles. A design featuring “cool” blues and purples might make a warm-toned client’s skin look sallow or gray. At naillie.com, we teach artists to use the “Swipe Test”—holding three varying shades of a similar color against the skin to see which “lifts” the complexion.
Masterclass: The Step-by-Step Design Selection Process
This is the exact workflow used by elite nail technicians to ensure every client leaves with a design that is both stunning and functional.
Step 1: The Lifestyle Audit (0-2 Minutes)
The artist begins by asking strategic questions. Do you type all day? Are you a gardener? Are you attending a specific event? A client who spends eight hours a day on a mechanical keyboard should rarely be encouraged toward long “Stiletto” shapes with protruding 3D crystals. For these clients, the artist will suggest “Negative Space” designs or “Encapsulated Art,” where the design is protected under a smooth layer of clear gel.
Step 2: Shape Optimization
The artist assesses the “C-Curve” of the nail. If a nail is naturally flat, certain shapes like the “Square” can lead to premature snapping at the corners. The artist will recommend an “Oval” or “Squoval” shape and adapt the design to fit those softer contours. Design elements like “Side-Wall Shading” can be used to make a wide nail bed appear more slender.
Step 3: Design Composition and Symmetry
This is where the “Art” meets the “Logic.” The artist decides on the placement of “Accent Nails.” Usually, the ring finger and middle finger are chosen for heavy art because they have the most surface area and are less likely to suffer impact than the thumb or index finger. The artist balances the “Visual Tension”—if the left hand has a complex character painting, the right hand might have a complementary abstract swirl to maintain balance without being an identical twin.
Professional Secrets: Industry Tips for Elite Results
- The “Two-Tone Rule”: Professional artists often mix two different top coats—a high-gloss for the base and a matte for the art—to create depth that can’t be achieved with color alone.
- Lighting Context: An artist knows that “Office Fluorescent” light and “Sunset Golden Hour” light react differently to pigments. They will often check a swatch under a 5500K daylight lamp to ensure the color holds its integrity.
- The “Growth Gap” Strategy: If a client can only come in every 4-5 weeks, the artist will steer them toward “Negative Space” or “Ombre” designs near the cuticle. This masks the regrowth gap, making the design look fresh for twice as long.
Troubleshooting: 10 Common Scenarios and Solutions
- The Nail Biter: Use “Structure Gel” to create a small extension and suggest busy, textured art (like “Tortoiseshell”) to discourage further biting by masking the natural edge.
- The Corporate Professional: Suggest “Micro-French” or “American Manicures” in muted mauves or sheer nudes. It’s sophisticated but allows for personal flair.
- The Chronic “Lifter”: Avoid heavy pigments near the cuticle. Stick to high-quality, sheer builder gels and minimal art to reduce weight.
- Hyperhidrosis (Sweaty Hands): Focus on aggressive dehydration of the nail plate and suggest designs that don’t require long “air-dry” times, sticking exclusively to LED-cured products.
- Thin, Brittle Nails: Avoid heavy mechanical filing. Suggest “Gel Polish” over “Acrylic” and keep the design flat (no heavy stones).
- Uneven Nail Beds: Use “Camouflage Base” colors to even out the tone before applying the design.
- The Wedding Client: Suggest colors that complement the jewelry (Gold vs. Silver) rather than the dress. “Pearlescent Chrome” is a modern classic.
- The Vacationer: High-impact neon pigments and “Hard Gel” top coats are necessary to withstand sand and chlorine exposure.
- The “I Don’t Know” Client: Use the “Season/Holiday” default. If it’s October, suggest muted earth tones; if it’s April, suggest pastels or florals.
- Allergy Sensitivity: Choose “HEMA-Free” products and minimalist designs that don’t require excessive skin contact during the painting process.
Maintenance and Long-Term Care
Choosing the design is only half the battle; maintaining it is where the client’s responsibility begins. At naillie.com, we recommend the following protocol for any professional design:
- Daily Hydration: Use a high-quality jojoba-based cuticle oil twice daily. This keeps the polymer flexible, preventing the “snapping” of intricate designs.
- The Glove Rule: Any contact with household chemicals or even prolonged water exposure (dishwashing) can cause “delamination” of the gel layers. Gloves are non-negotiable.
- No Filing: Clients should never file the tips of their designed nails, as this “breaks the seal” of the top coat, leading to immediate chipping.
Key Takeaways for Choosing Designs
- Anatomy First: Always match the shape and design complexity to the client’s finger length and nail bed health.
- Lifestyle is King: A design that breaks in three days is a failure, no matter how beautiful it is.
- Color Theory Matters: Use skin undertones to select shades that brighten the hand.
- Chemistry Knowledge: Understand how different products interact to ensure the design lasts.
FAQ: Complex Design Questions
How do you handle a client who wants a design that simply won’t work on their nail type?
Education is key. We teach artists to use the “Yes, and…” method. “Yes, we can do that color, and to make sure it lasts on your shorter nails, let’s adapt the pattern to a vertical orientation so it doesn’t overwhelm the nail plate.”
What is the most durable design for someone who works with their hands?
Encapsulated glitter or “Glitter Ombre” using hard gel. Because the pigment is suspended in a structural medium, it is nearly impossible to chip, and the ombre at the cuticle hides growth.
How does “C-Curve” depth affect design choice?
A deep C-curve provides great natural strength but can distort hand-painted portraits. For high-curve nails, abstract or geometric designs work better as they aren’t as affected by the “wrap” of the nail.
Why do some light colors turn “blue” or “yellow” after a week?
This is often due to “top coat porousness.” Light colors absorb dyes from denim or hair products. Artists should choose a “non-wipe, stain-resistant” top coat for designs using white or pastel palettes.
What is the “Golden Ratio” in nail art?
It is the 2/3rds rule. Generally, a design looks most harmonious when the “focal point” (a stone, a flower, or a line) is placed at the 2/3rds mark of the nail plate, either from the cuticle or the side wall.
How do you choose a design for a client with very small nail beds?
Avoid “borders” or French tips, which visually “cut” the nail and make it look smaller. Instead, use “all-over” patterns or “vertical gradients” to create the illusion of more space.
Can design choice affect the perceived temperature of a client?
Yes. Psychologically, “Cool” tones (blues/greens) can make a client feel more professional and calm, while “Warm” tones (reds/oranges) are often chosen for high-energy social events or vacations.
How do you price complex designs during the selection phase?
Most professional artists use a “Tiered” system. Tier 1: Simple lines/dots. Tier 2: Multi-color abstracts. Tier 3: 3D, Character art, or full-hand intricate patterns. This should be discussed during the initial 2-minute audit.
Quick Summary
- Nail design selection depends on health, anatomy, and lifestyle
- Shape and proportions affect visual balance
- Color choice should match skin undertones
- Durability is more important than trend
These three factors work together to guide every professional design decision.